[ Обновленные темы · Новые сообщения · Участники · Поиск · RSS ]
Результаты поиска
Проверенные
Сообщений: 336
Реп: 51
Тут выкладываем свои модельки, *.xom, обязательно со скрином!
Предлагайте свои кандидатуры


Проверенные
Сообщений: 336
Реп: 51
Quote (AlexBond)
Такс... я тут посмотрел может написать скрипт импорта Xom3D в Блендер? Правда это сложно... Но может блендер сможет обеспечить все что нужно для удобного редактирования... Потому что 3DSMAX не обеспечивает этого... А в Maya тоже неохота ковыряться, да и Блендер более доступен для всех. Что думаете?

Ну круто


Проверенные
Сообщений: 336
Реп: 51
385

 
Проверенные
Сообщений: 336
Реп: 51
Очень радуюсь правда..............Ваще жесть

 
Проверенные
Сообщений: 336
Реп: 51
Кто смотрел и каково ваше мнение?

 
Проверенные
Сообщений: 336
Реп: 51
Quote (K@ST)
Отстой а не фильм

Ну кому как, это очень глубокий и содержательный фильм


Проверенные
Сообщений: 336
Реп: 51
392

 
Проверенные
Сообщений: 336
Реп: 51

Вот создаю свой тутториал, мне нужно знать, что именнно вам нужно в нём, например я могу просто описать замещение текстуры, могу описать заменение одной модели на другую, каковы ваши предложения?
Прикрепления: 6332472.jpg (41.9 Kb)


Проверенные
Сообщений: 336
Реп: 51
Quote (Hitman27)
3)Разделы для английского форума

можно взять на себя?


Проверенные
Сообщений: 336
Реп: 51
When I viewed the site team17 bumped to the post about xom files, there was this screenshot, where you can download this program, if there was this XomAnalyzer?


Проверенные
Сообщений: 336
Реп: 51
Beginner's guide on how to tweak W4:M Weapons
This is a guide for newbs to tweaking to learn how to tweak.
Ok, go to "My Computer" then "Local Disc: C" then go into "Program files", "Codemasters", "Worms 4 Mayhem" and finally "Data" and "Tweak".

Open the file called "WeapTwk" with Notepad or Wordpad, then find the weapon you want. For this example I'm going to use bazooka:

Code

<ContainerResources href='kWeaponBananaBomb'/>
<ContainerResources href='kWeaponBananette'/>
<ContainerResources href='kWeaponBaseballBat'/>
<ContainerResources href='kWeaponBazooka'/>
<ContainerResources href='kWeaponClusterBomb'/>
<ContainerResources href='kWeaponClusterGrenade'/>
<ContainerResources href='kWeaponConcreteDonkey'/>

Now hit Ctrl+F and paste kWeaponBazooka into the window that appears. Keep pressing enter until it takes you to this part:
Code

<XContainerResourceDetails id='kWeaponBazooka'>
<Value href='kWeaponBazooka-0'/>
<Name>kWeaponBazooka</Name>
<Flags>81</Flags>
</XContainerResourceDetails>
<PayloadWeaponPropertiesContainer id='kWeaponBazooka-0'>
<IsAimedWeapon>true</IsAimedWeapon>
<IsPoweredWeapon>true</IsPoweredWeapon>
<IsTargetingWeapon>false</IsTargetingWeapon>
<IsControlledBomber>false</IsControlledBomber>
<IsBomberWeapon>false</IsBomberWeapon>
<IsDirectionalWeapon>true</IsDirectionalWeapon>

Now scroll down until you find what you want to edit, I'd reccomend leaving the "Is Aimed/Powered/TargetingWeapon/ControlledBomber etc alone unless you're VERY experienced *Cough Kilburn Cough*

I'm going to edit these two:

Code
<PayloadGraphicsResourceID>Bazooka.Payload</PayloadGraphicsResourceID>
<Payload2ndGraphicsResourceID></Payload2ndGraphicsResourceID>
<Scale>1</Scale>
<Radius>5</Radius>
<AnimTravel></AnimTravel>

So I edit them to this:

Code
<PayloadGraphicsResourceID>Grenade</PayloadGraphicsResourceID>
<Payload2ndGraphicsResourceID></Payload2ndGraphicsResourceID>
<Scale>2</Scale>
<Radius>5</Radius>
<AnimTravel></AnimTravel>

This means that the projectile will be twice the normal size and will be a grenade instead of a rocket.
Now to edit some of my favourite values:

Code
<DetonatesOnLandImpact>true</DetonatesOnLandImpact>
<DetonatesOnExpiry>false</DetonatesOnExpiry>
<DetonatesOnObjectImpact>true</DetonatesOnObjectImpact>
<DetonatesOnWormImpact>true</DetonatesOnWormImpact>
<DetonatesAtRest>false</DetonatesAtRest>
<DetonatesOnFirePress>false</DetonatesOnFirePress>
<DetonatesWhenCantJump>false</DetonatesWhenCantJump>

So when I'm done it should look like this:

Code

<DetonatesOnLandImpact>false</DetonatesOnLandImpact>
<DetonatesOnExpiry>false</DetonatesOnExpiry>
<DetonatesOnObjectImpact>false</DetonatesOnObjectImpact>
<DetonatesOnWormImpact>false</DetonatesOnWormImpact>
<DetonatesAtRest>true</DetonatesAtRest>
<DetonatesOnFirePress>true</DetonatesOnFirePress>
<DetonatesWhenCantJump>false</DetonatesWhenCantJump>

This means that it well only blow up when you click "fire" or if it comes to rest and stops bouncing.

Now for some more!

Code
<DetonateMultiEffect>1</DetonateMultiEffect>
<WormCollideResponse>0</WormCollideResponse>
<WormDamageMagnitude>50</WormDamageMagnitude>
<ImpulseMagnitude>0.29</ImpulseMagnitude>
<WormDamageRadius>72</WormDamageRadius>

I'll edit it to this:

Code
<DetonateMultiEffect>1</DetonateMultiEffect>
<WormCollideResponse>0</WormCollideResponse>
<WormDamageMagnitude>100</WormDamageMagnitude>
<ImpulseMagnitude>0.29</ImpulseMagnitude>
<WormDamageRadius>72</WormDamageRadius>

Now this means it will do 100 damage max to any worm it hits instead of 50!
Now for some of the most fun values to tweak:

Code
<NumBomblets>0</NumBomblets>
<BombletMaxConeAngle>0</BombletMaxConeAngle>
<BombletMaxSpeed>0</BombletMaxSpeed>
<BombletMinSpeed>0</BombletMinSpeed>
<BombletWeaponName></BombletWeaponName>

I'll explain how each works:
NumBomblets: The number of bomblets (like a cluster bomb's clusters) that will come out of the projectile upon detonation.
BombletMaxConeAngle: The max degrees the bomblets will spread apart. I reccommend no higher than 2.0.
BombletMaxSpeed: This is the maximum speed the bomblets will be able to come down at. If you're crazy (like me) you can set this to above 10.
BombletMinSpeed: The minumum speed the bomblets will come down at. If you always want them to come down the same speed, set this to the same as BombletMaxSpeed.
Bombletweaponname: The name of the weapon you want to be the bomblets. For example, if you wanted holy hand grenades to come out you would choose "kWeaponHolyHandGrenade". NEVER set this to the same weapon you're having the bomblets come from unless you want to crash your game.

When I've edited all of this it should look like this:

Code

<NumBomblets>7</NumBomblets>
<BombletMaxConeAngle>2.5</BombletMaxConeAngle>
<BombletMaxSpeed>12</BombletMaxSpeed>
<BombletMinSpeed>6</BombletMinSpeed>
<BombletWeaponName>kWeaponHolyHandGrenade</BombletWeaponName>

Now this should make the Bazooka's projectile drop 7 Hly Hand Grenades upon detonation.
Now to tweak the Launcher of the bazooka.

Code
<WeaponGraphicsResourceID>Bazooka.Weapon</WeaponGraphicsResourceID>

I'll change it to the ninja rope gun.

Code
<WeaponGraphicsResourceID>NinjaRope.Gun</WeaponGraphicsResourceID>

-------------------------------------------------------------------------------
This point was made by Hot Gravy

WARNING! ALWAYS MAKE BACKUP FILES BEFORE TWEAKING UNLESS YOU WANT TO RE INSTALL YOUR GAME FOR NEW TWEAKS!


Проверенные
Сообщений: 336
Реп: 51
Yes thats right! a particle tweaking tutorial!

WARNING! ALWAYS MAKE BACKUP FILES BEFORE TWEAKING UNLESS YOU WANT TO RE INSTALL YOUR GAME FOR NEW TWEAKS!

its one of the great things of tweaking, making your own effects

but ofcourse this is a basic tutorial we just go make an effect out of some other allready made effects!

ok, lets make an good explosion. to begin you just need to know a few things.

the long list of <ContainerResources href='name_of_the_effect_here'/> are names of the effects, those names let the game now that there is an effect, well for this tutorial we will use WXP_GreenExplosion, called WXP_GreenExplosion. i like to call this list just the nameslist, keep that in your mind or if you cant trust your head write it down on your hand! well whatever, so thats the nameslist. now if you scroll down you will get to some other stuff, you will understand what that does later. now lets begin!

First we want to open up the PartTwk.xml file so go to the start button, right click on it and click explore! go to program files, then to codemaster, then to worm 4 mayhem, then to data, then to tweak and there you are! now right click on PartTwk.xml and open it up with notepad! now you are ready to tweak!

So lets go. scroll down the nameslist untill the last name. it should look like:

Code
<ContainerResources href='zzzSteve2'/>
</XDataBank>

Now make a space in betwwen it so it looks like:
Code
<ContainerResources href='zzzSteve2'/>

</XDataBank>

In the space you type:<ContainerResources href='WXP_GreenExplosion'/>
so it looks like:
Code
<ContainerResources href='zzzSteve2'/>
<ContainerResources href='WXP_GreenExplosion'/>
</XDataBank>

Ok, done with the name, now scroll aaaaaaall the way down to the bottom and there you will find something like:
Code
</ParticleEmitterContainer>
</xomObjects>
</xomArchive>

Now make a space in between it so it looks like:
Code
</ParticleEmitterContainer>

</xomObjects>
</xomArchive>

In between that space you go type:
Code
<XContainerResourceDetails id='WXP_GreenExplosion'>
<Value href='WXP_GreenExplosion-0'/>
<Name>WXP_GreenExplosion</Name>
<Flags>81</Flags>
</XContainerResourceDetails>
<EffectDetailsContainer id='WXP_GreenExplosion-0'>
<EffectNames>WXPF_GreenGlowBigBang</EffectNames>
<EffectNames>WXPF_GreenTrail1</EffectNames>
<EffectNames>WXP_ExplosionG_RingDark</EffectNames>
<EffectNames>WXPF_BlueTrails_1</EffectNames>
</EffectDetailsContainer>

Now the effect is done, but ofcourse you still dont understand what we did, do ya? well, let me explain it to you.
First about this part:
Code
<XContainerResourceDetails id='WXP_GreenExplosion'>
<Value href='WXP_GreenExplosion-0'/>
<Name>WXP_GreenExplosion</Name>
<Flags>81</Flags>
</XContainerResourceDetails>

this part lets the game now that there isnt only a name of an effect but that it also contains something! thats all i can really explain about it.

Now the other part:

Code
<EffectDetailsContainer id='WXP_GreenExplosion-0'>
<EffectNames>WXPF_GreenGlowBigBang</EffectNames>
<EffectNames>WXPF_GreenTrail1</EffectNames>
<EffectNames>WXP_ExplosionG_RingDark</EffectNames>
<EffectNames>WXPF_BlueTrails_1</EffectNames>
</EffectDetailsContainer>

lets the game now which effects are used in it! so, wasn't that simple? now for getting the effect in the game!

Close down this notepad and click yes when it asks you to save it. and now open up WeapTwk. then hit ctrl + f and search for kWeaponBazooka. hit the search button two times and scroll down until you find something which looks like:

Code
<ArielFx>WXP_BazookaTrailPack</ArielFx>
<DetonationFx>WXP_GreenExplosion</DetonationFx>
<DetonationSfx>ExplosionRegular</DetonationSfx>
<ExpiryFx></ExpiryFx>
<SplashFx>WXP_WaterSplash</SplashFx>
<SplishFx>WXP_WaterSmallSplash</SplishFx>
<SinkingFx>WXP_UnderWaterBubbles</SinkingFx>
<BounceFx></BounceFx>
<StopFxAtRest>true</StopFxAtRest>
<BounceSfx></BounceSfx>
<PreDetonationSfx></PreDetonationSfx>
<ArmSfx1Shot></ArmSfx1Shot>
<ArmSfxLoop></ArmSfxLoop>
<LaunchSfx>RocketRelease</LaunchSfx>
<LoopSfx>BombWhistle</LoopSfx>
<BigJumpSfx></BigJumpSfx>
<WalkSfx></WalkSfx>

I know, thats a lot of text but you will be able to find it. now this piece of text tells the game which effect is used for what.
now search something like this:<DetonationFx>WXP_ExplosionX_Med</DetonationFx>
and change it into:<DetonationFx>WXP_GreenExplosion</DetonationFx>

So now the game knows it needs to use our effect! now close down this notepad, click yes again and start up worms 4 mayhem, start a game, shoot your bazooka and lets hope it worked!

If you did it alright it should look a bit like this:
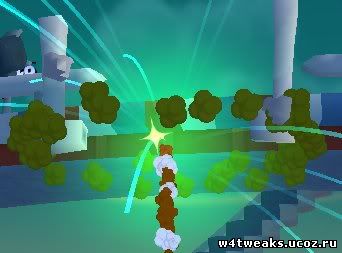
------------------------------------------------------------------------------- This point was made by Stryke WARNING! ALWAYS MAKE BACKUP FILES BEFORE TWEAKING UNLESS YOU WANT TO RE INSTALL YOUR GAME FOR NEW TWEAKS!


Проверенные
Сообщений: 336
Реп: 51
TGATool - A tool for working with Targa Images

USING....

Use the File menu to Load Images in Targa or Bmp format. The Main image
will be displayed in the main part of the window. If any Alpha channel is found
this will be displayed in the smaller thumbnail to the right of the window.

Edit the main image by either selecting "Send Main Image to Editor" from the
Image menu or just Double-click on the Image. This will send it to the currently
selected editing program (initial default MSPaint). Once finished editing Save (not
Save As) from the Editing program then use "Reload after Edit" from the Image
menu to import the edited version of the image.

Follow a similar process to edit the Alpha channel.

SAVING

Using Save from the File menu will let you save a new Targa version of the
Image (with Alpha if present).

EXPORTING

The Export menu gives options to save a Bmp version of the image.

ADDING ALPHA

Many images do not have an alpha channel. If, as part of the editing process,
you wish to add an alpha channel so that transparencies can be included then
you can use the buttonsunder the Alpha thumbnail to create the alpha channel.

"Create Alpha Channel" will create a blank (fully opaque) alpha channel which
you can then edit to add transparent areas.

"Create Alpha Template" will create an alpha channel as a greyscale copy of
the main image. This will make it easier to see exactly where you want to apply
the transparency. Once the transparent areas have been painted in black you
will need to paint over the non-transparent areas in white.

EDITING ALPHA

When you send the alpha channel to your paint program for editing you should
think of it as a transparency map that is applied to the actual pixels in the main
image. Each point on the alpha will correspond to the same point on the main
image and the grey level will decide how much transparency is applied to the
main image at that point. Black will give fully-transparent. White will give fully
opaque and any shade of grey inbetween will give a partial transparency based
on what level it is between White and Black.

-----------------------------------------------------------
Registering TgaTool with Windows
-----------------------------------------------------------

You may if you wish set it so that Windows will use TgaTool as the default
program for opening TGA Files. This can be done from the Prefs menu where
there are 2 options. One to Register TGA to TgaTool and the other to delete
the association.
This will remove any existing association for TGA so you may not wish to do this.

-----------------------------------------------------------
You can get this program here


Проверенные
Сообщений: 336
Реп: 51
Quote (Hitman27)
сменил стиль кнопок форума, картинки не переводятся гуглом

А если кто нить в России тупо не знает Englishа?(Ну вроде есть такие)Вон у Итальянцев же нет русских кнопок и они не парятся на счёт "Поймёт кто нить не поймёт"


Проверенные
Сообщений: 336
Реп: 51
398

 
Проверенные
Сообщений: 336
Реп: 51
Я знаю, что уже существует скрипт для расстановки червей на карте, точнее несколько Эммитеров и сам скрипт, так вот, кто-нибудь может выдрать скрипт для расстановки мин ну и бочек(если не затруднит) из стандартных скриптов, вроде он находится в MineAllMine.lua. Кто нибудь сможет осилить?

 
Проверенные
Сообщений: 336
Реп: 51
Quote (AlexBond)
Предстану и я в одном из многих обличий. Да да!!! это AlexBond =)

Твоя аватарка на тебя похожа =)


Проверенные
Сообщений: 336
Реп: 51

I am here too!


Проверенные
Сообщений: 336
Реп: 51
Я!

 
Проверенные
Сообщений: 336
Реп: 51
Вот, собственно моя модель, получилось прикольно, так сказать, StalkerWorm

Скачать, и опробовать
Прикрепления: 1030897.jpg (240.9 Kb)


Поиск: